Casing the Jewel Store is the reconnaissance and planning mission before the Vangelico robbery. You need an interior security photograph, a rooftop view of the ventilation and a decision on the approach and crew. Its gold targets are an eight-minute finish and a single photo containing all three security features.
Step-by-step walkthrough
-
Meet Lester in suitable clothes
Use Michael’s wardrobe to put on a suit if the mission refuses his outfit, then visit the L marker at Darnell Bros. Drive Lester to Rockford Hills and park at the destination. Walk into Vangelico normally, with your weapon put away. This is reconnaissance; starting a disturbance can end the attempt.
-
Frame the keypad, camera and vent together
Activate the camera built into Michael’s glasses. Look towards the wall with the alarm keypad beside the doorway, keeping the ceiling camera and ventilation grille in the same wide view. Avoid zooming tightly onto one object. Take the photograph and listen for Lester’s response. Picture Perfect needs all three features in one image, rather than three separate close-ups.
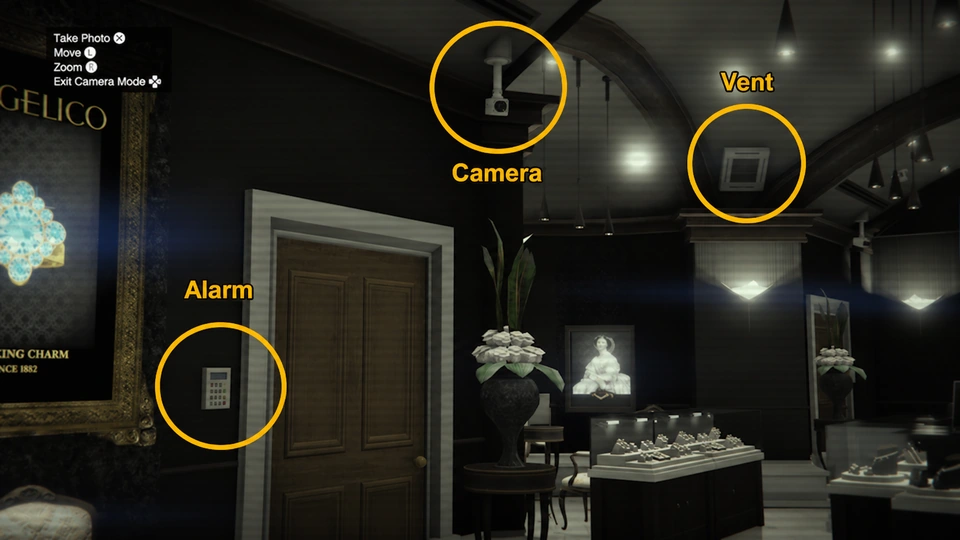
The Vangelico security camera, ventilation grille and alarm keypad in one frame. Illustration. -
Speak to the assistant and return to the car
Finish the conversation with the sales assistant, then walk back to Lester. Stay in the public part of the shop: going behind the counter or into restricted rooms can expose Michael. The robbery itself does not happen during this visit.
-
Use the construction entrance for the roof
Drive around the block until you find the building under renovation. Enter through the open gap in the boarded frontage, then use the interior stairs and ladder. Once on the roof, continue towards the north side until Lester directs you to the higher vantage point. Do not spend time trying to enter Vangelico through its locked roof access.
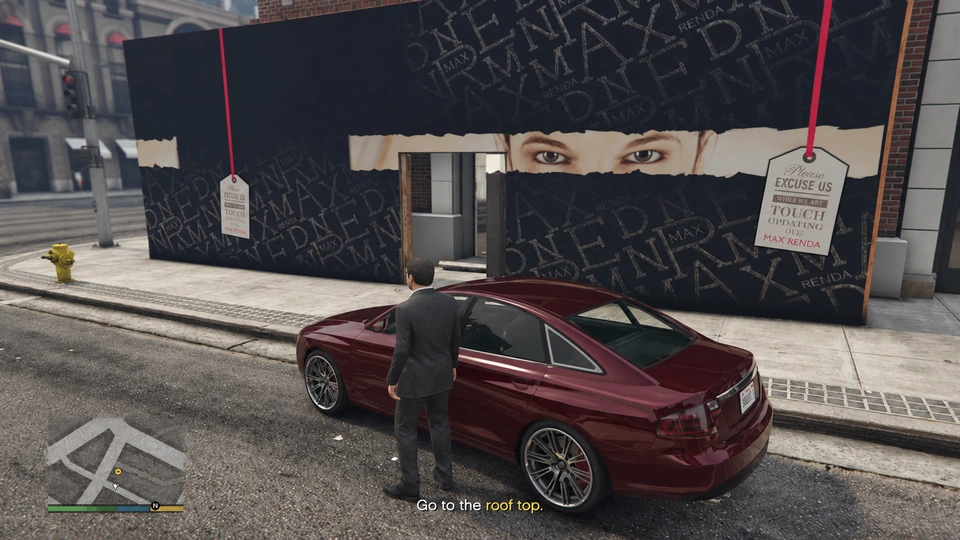
The building under renovation provides access to the Vangelico rooftop. Illustration. -
Photograph the ventilation unit from high ground
Climb to the marked vantage point and use the glasses camera again. Frame the Vangelico rooftop ventilation unit and take the required picture. Wait for the objective to update, then retrace the route to the ladder and car. Jumping off the roof is an unnecessary risk on a timed run.
-
Return to the factory and confirm the plan
Drive Lester back to Darnell Bros. At the planning board, choose an approach, driver, gunman and hacker, then confirm. Consider the team before starting a speed attempt so you can make the selections promptly. Keep a separate manual save before this mission if you want to compare different plans in your ongoing story.
Gold medal checklist
- Time: Finish within 8:00. Skip cutscenes on a replay and follow the construction-to-rooftop route without wandering.
- Picture Perfect: Capture the alarm keypad, security camera and ventilation grille in one interior photo. The rooftop image is a separate task.
Smart or Loud: what changes next?
Smart uses a pest-control disguise and gas. Its preparations are Bugstars Equipment and BZ Gas Grenades. Loud uses a direct armed entry and requires Carbine Rifles. You only prepare the approach chosen on your board; the two lists are not a combined shopping list.
Choose a crew for your goal
For a payout-focused Smart run, Karim Denz, Packie McReary and Rickie Lukens are a strong low-cut combination. Packie must first be unlocked through the Getaway Driver random event. Gustavo Mota is the reliable gunman alternative if Packie is unavailable.
For an easier first escape, Eddie Toh brings more suitable off-road bikes and clearer guidance, but takes a larger cut. A more expensive hacker gives you extra time inside the store. Rickie is cheaper but leaves less room for slow movement between display cases.
Do not choose Norm Richards solely because his percentage is lowest. His mistakes and fatal crash can reduce the return through lost loot and casualty costs. A low crew percentage is only one part of the payout.
Common questions
Why can’t I start at the factory?
Check that Friend Request is complete, you are controlling Michael and he is wearing smart clothes. A suit from his wardrobe is suitable.
Why are the heist setups still missing?
Complete Daddy’s Little Girl as well, then follow Lester’s messages and the approach selected on the board. Smart and Loud unlock different preparations.
What happens next
Your chosen preparation missions lead to The Jewel Store Job. Use the story mission index to keep track of the branch you selected.
The Jewel Store Job: both approaches
Follow the branch chosen on Lester’s planning board. Smart uses two setups; Loud uses one.
Smart approach
- Bugstars Equipment — steal the van
- BZ Gas Grenades — intercept the shipment
- The Jewel Store Job — Smart walkthrough